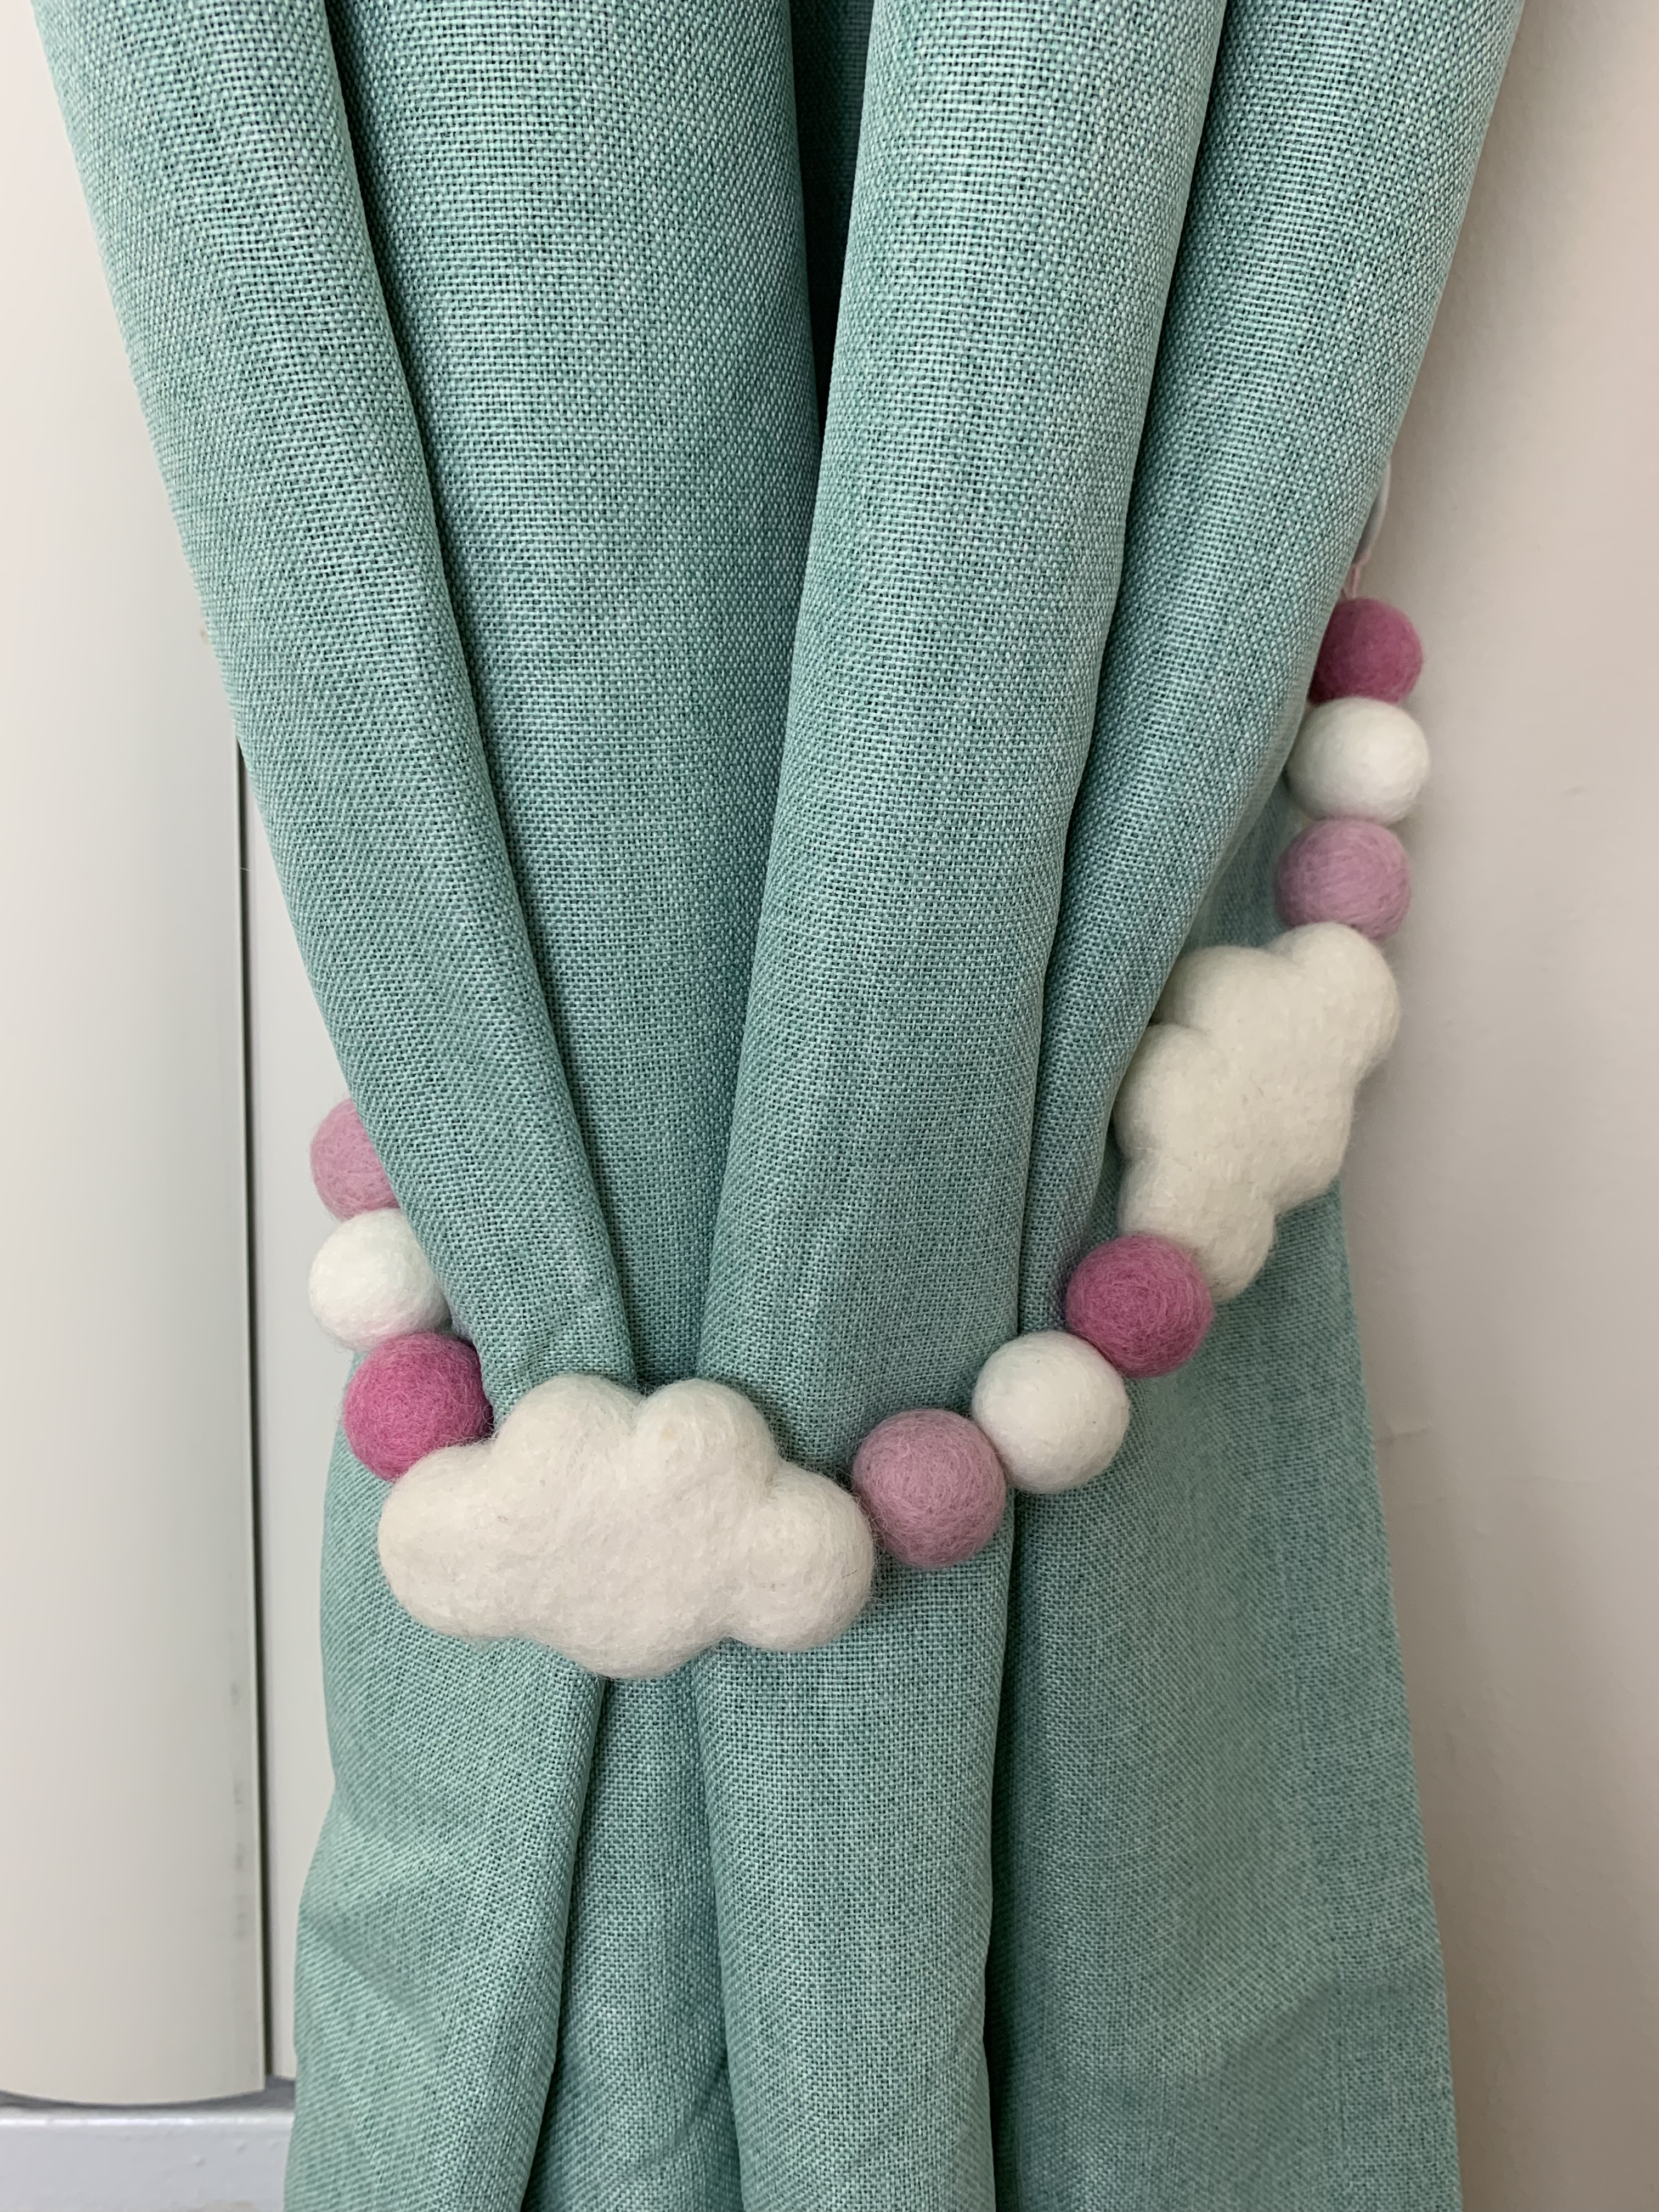
Want to know what to do with all those beautiful felt succulents you just made? Well, The Crafty Lefty is here to show you 5 different ways you can use them or display them in your home!


The Crafty Lefty is your headquarters for all things crafty! We create DIY video tutorials for the latest craft trends, provide design and decor tips, write product reviews on craft items from your favorite stores & sell custom party supplies!
Want to know what to do with all those beautiful felt succulents you just made? Well, The Crafty Lefty is here to show you 5 different ways you can use them or display them in your home!

Our last and final succulent is here to finish out our DIY Felt Succulent Series! While this succulent might be the most time consuming to create, the end result is worth it, I promise! Let The Crafty Lefty show you how to make this felt succulent from scratch!

This is the 4th felt succulent tutorial in our series, and by far, the easiest succulent to create. Just takes some simple folding work – almost like felt origami – to craft this cluster succulent. Go ahead. Give it a try. I promise you won’t succ-ulent.

For our third succulent, we will be using a felt flower template I found on Pinterest. I thought the design could be used for a felt succulent, especially if you’re doing a cluster display with several other types of felt succulents. Also, this layered felt succulent makes a nice contrast with the roses and star succulents we’ve been making so far in our Succulent Series. Whether you are adding your succulents to a wreath, to a terrarium, or to a vase, this layered succulent will be a great addition to your felt succulent collection!


[Disclosure: I only recommend products I would use myself and all opinions expressed here are my own. This post may contain affiliate links that are at no additional cost to you, and I may earn a small commission. Thanks for supporting the brands that support this blog.]
We are in week 2 of The Crafty Lefty’s Felt Succulent Series. That means another DIY tutorial with free patterns and video tutorials on how to create your own felt succulents!!
We know that these felt succulents are EVERYWHERE these days, but sometimes it’s hard to find free patterns or the instructions they come with can be a little confusing. That’s why I’ve created 5 tutorials on how to craft 5 different felt succulents. I’ve done all the research and trouble-shooting and experimenting FOR you.
All you have to do is stay-tuned to The Crafty Lefty’s DIY Felt Succulents Series to learn how to make these 5 different felt succulents with FREE patterns. Yeah, you read that right. There are so many free felt succulent patterns out there made by totally awesome craft bloggers. So instead of re-inventing the wheel, I’ve linked directly to their site so you can grab the free pattern from them (and check out their super cute crafts)!
New to the Crafty Lefty’s Felt Succulent Series? Don’t forget to check out the rest of the DIY tutorials below:
Now on to our second felt succulent: the star succulent from Hallmark. Yeah, I know. I was like, Hallmark is making free felt succulent patterns now? But I didn’t waste time thinking about that too much, and just grabbed their super cute (and super free!) succulent patterns.
Prefer watching over reading? No problem! Click here to watch the DIY video tutorial.
Supplies: All you’ll need for this star succulent is felt (either stiff or soft, in whatever color you like), fabric scissors (or any sharp scissors), straight pins, hot glue, and the printed hallmark pattern, found here.

1. First cut out the 3 petal shapes from the pattern, and pin them to your felt. Hallmark offers 4 different ways to use these shapes to make their star succulents: mini, small, medium, and large. I decided to make the largest star succulent, which means I needed to cut more petal shapes from my felt.
 2. Once all of your petal shapes have been cut, organize them by size and fire up that hot glue gun.

3. For each one of these petal shapes, you’ll first be folding and gluing them at an off-set with a hot glue gun. That means, not exactly in half, but staggered. Please see the image below as an example of how I folded the smallest petal shape for the star succulent.

4. Once you have glued both of your smallest petal shapes at an offset, you’ll be folding and gluing them to create the middle portion of your star succulent. Here’s how: You will apply glue to the inside bottom edge of your petal, starting at one end and working your way to the end.

5. Then, roll the felt over the hot glue to create a rosette. Take your second off-set smallest petal shape, and roll your rosette over that second petal. Now, your rosette will look a bit bigger, like this:

6. Next, you will add your medium sized petals. You will do the same, and fold and hot glue each one of them at an off-set. Once you have placed a line of glue along the bottom of one of those medium sized petals, you will take your rosette, seam side down, and lay it flat against your medium-sized petal. Roll the rosette over the medium-sized petal to create an even bigger rosette. Continue rolling and gluing until you have used all of your medium sized petals.

7. Now on to your last layer — the largest petal size. Go ahead and glue all of your 7 petals at an offset first. Then, take the rosette you’ve created so far, and glue your folded petals all around (as you did with the medium petal size). At some point, instead of putting glue on the felt piece and then rolling the rosette, it might make more sense to add the hot glue to the rosette itself, and then press the felt piece to the rosette. Please see the image below.

8. …and that’s it! This is what your final star succulent should look like!

Let me know in the comments how you liked this pattern. And stay tuned for more DIY Felt Succulent Tutorials for the next several weeks! I’ll also be adding 5 unique ways to use felt succulents in your home that you won’t want to miss either!

Seen these incredible felt succulents all over Pinterest and wanna know how? You’ve come to the right place! The Crafty Lefty will show you 5 different ways to craft felt succulents in our DIY Felt Succulents Series. The first succulent is from the SixCleverSisters Blog, and it’s a rose succulent.

[Disclosure: I only recommend products I would use myself and all opinions expressed here are my own. This post may contain affiliate links that are at no additional cost to you, and I may earn a small commission. Thanks for supporting the brands that support this blog.]
So I know you’ve all seen the cute DIY felt Christmas trees alllll over Pinterest and Instagram this holiday. I know I did. And I drooled over the simplicity of the design, the fact that it was felt (meaning, it will last me more than just 1 year), and also a great way to use my extra craft supplies as decoration! As you can see, my felt Christmas trees look a little different. I used more vibrant colors because it matched my Christmas home decor, but then I added dainty lace, mini poms poms and gold beads to embellish the finished trees. I’m really happy with the way they came out, so keep reading my step-by-step tutorial to see how you can create this for yourself!
More of a watcher than a reader? Head over to the video tutorial here – https://www.youtube.com/watch?v=w-cQKs8Tays

First off, these are the supplies that you’ll need:
Optional Tree Accents:
The first thing you’ll need to do is to cut out 8 felt trees. Like I said, I got the pattern for my trees on One Little Project’s site. She has 7 different trees that you can choose from, and the best part is, it’s free! I took the PDF and enlarged the tree shape I wanted to use in Word. Then, I printed it and cut it out. The good thing about this tree pattern is that it has thick lines which makes it easier to cut and trace, especially since you’ll be cutting around it 8 times!

I suggest cutting out your felt trees with a comfy blanket and your fabric scissors while watching an old Christmas fav — it would be A Christmas Story for me.
“You’ll shoot your eye out, kid!”

To make the process easier, I recommend pinning your paper tree pattern to your felt. This will help keep your tree in place as you cut around it. I’ve found that three pins usually works well. (The Crafty Lefty Tip: Instead of pinning the tree pattern to the felt, I have tried tracing around the
 pattern using fabric pens and regular pens so I could just cut out the felt directly. But, I haven’t found any pen that works well on felt, without leaving stain marks.)
Once your tree pattern has been pinned, it’s time to cut out your first felt piece….and repeat 8 times! Didn’t I tell you to get a comfy blanket??
 Next, start getting your supplies together. Fire up that hot glue gun, get 1 wooden dowel, keep those pins nearby, and have all 8 felt pieces ready. Fold your first felt tree in half, and use your pins to keep it folded as shown in the picture below.
 Run a line of hot glue down the spine of the folded tree, keeping in mind not to add glue to the top 1/2 inch of your felt tree. Carefully press the folded spine of the tree to your wooden dowel and apply pressure for a few seconds. Remove your pins and add them to your next tree.

This is my strategy for adding the felt trees to your dowel. I like to glue the trees in quadrants. So when you glue the second tree, it will be directly opposite the first tree, as shown in the picture.

The third tree will be perpendicular to the trees you have already glued, and then the fourth tree will be directly opposite the third tree.
At this point, you’ve glued 4 trees, and you have 4 trees left. So you’ll need to glue each additional tree in between each tree that is already on the dowel. Flatten your trees so that the wooden dowel shows through, and start by gluing your fifth tree, as shown in the picture.

It’s easy to get confused as you’re gluing each new tree, so just remember, after you’ve glued your fifth tree, start in one direction, and skip one tree, and then glue your sixth tree there. After that, skip one tree, and glue your next tree in that spot, and so on until you are done.
Next you’ll need to connect the top points of all your trees that you didn’t glue. Put some glue at the top of your wooden dowel and pinch all of your points together to form a peak, as shown in the picture below.

…and you’re done with the felt part of your felt tree! All you have left is to drill your holes into your wood slices and place your dowel in the holes you just drilled.
 I used a 3/16 drill bit for these dowels, but all dowels are not the same thickness. So I would suggest starting with a drill bit that’s slightly smaller than your dowel thickness, and seeing if your dowel will fit. If not, go up a size with your bit until you get to the right size hole.

My dowel fit perfectly in the hole I made, so I did not need to use any glue to secure it. However, you can certainly use wood glue in case your hole is a bit loose. I like the idea of varying the look of my felt trees, so for some trees I used one log slice, and for others, I used a few slices of varying sizes.
Afterwards, I accented my trees by hot gluing gold beads, dainty lace and mini pom poms to them.


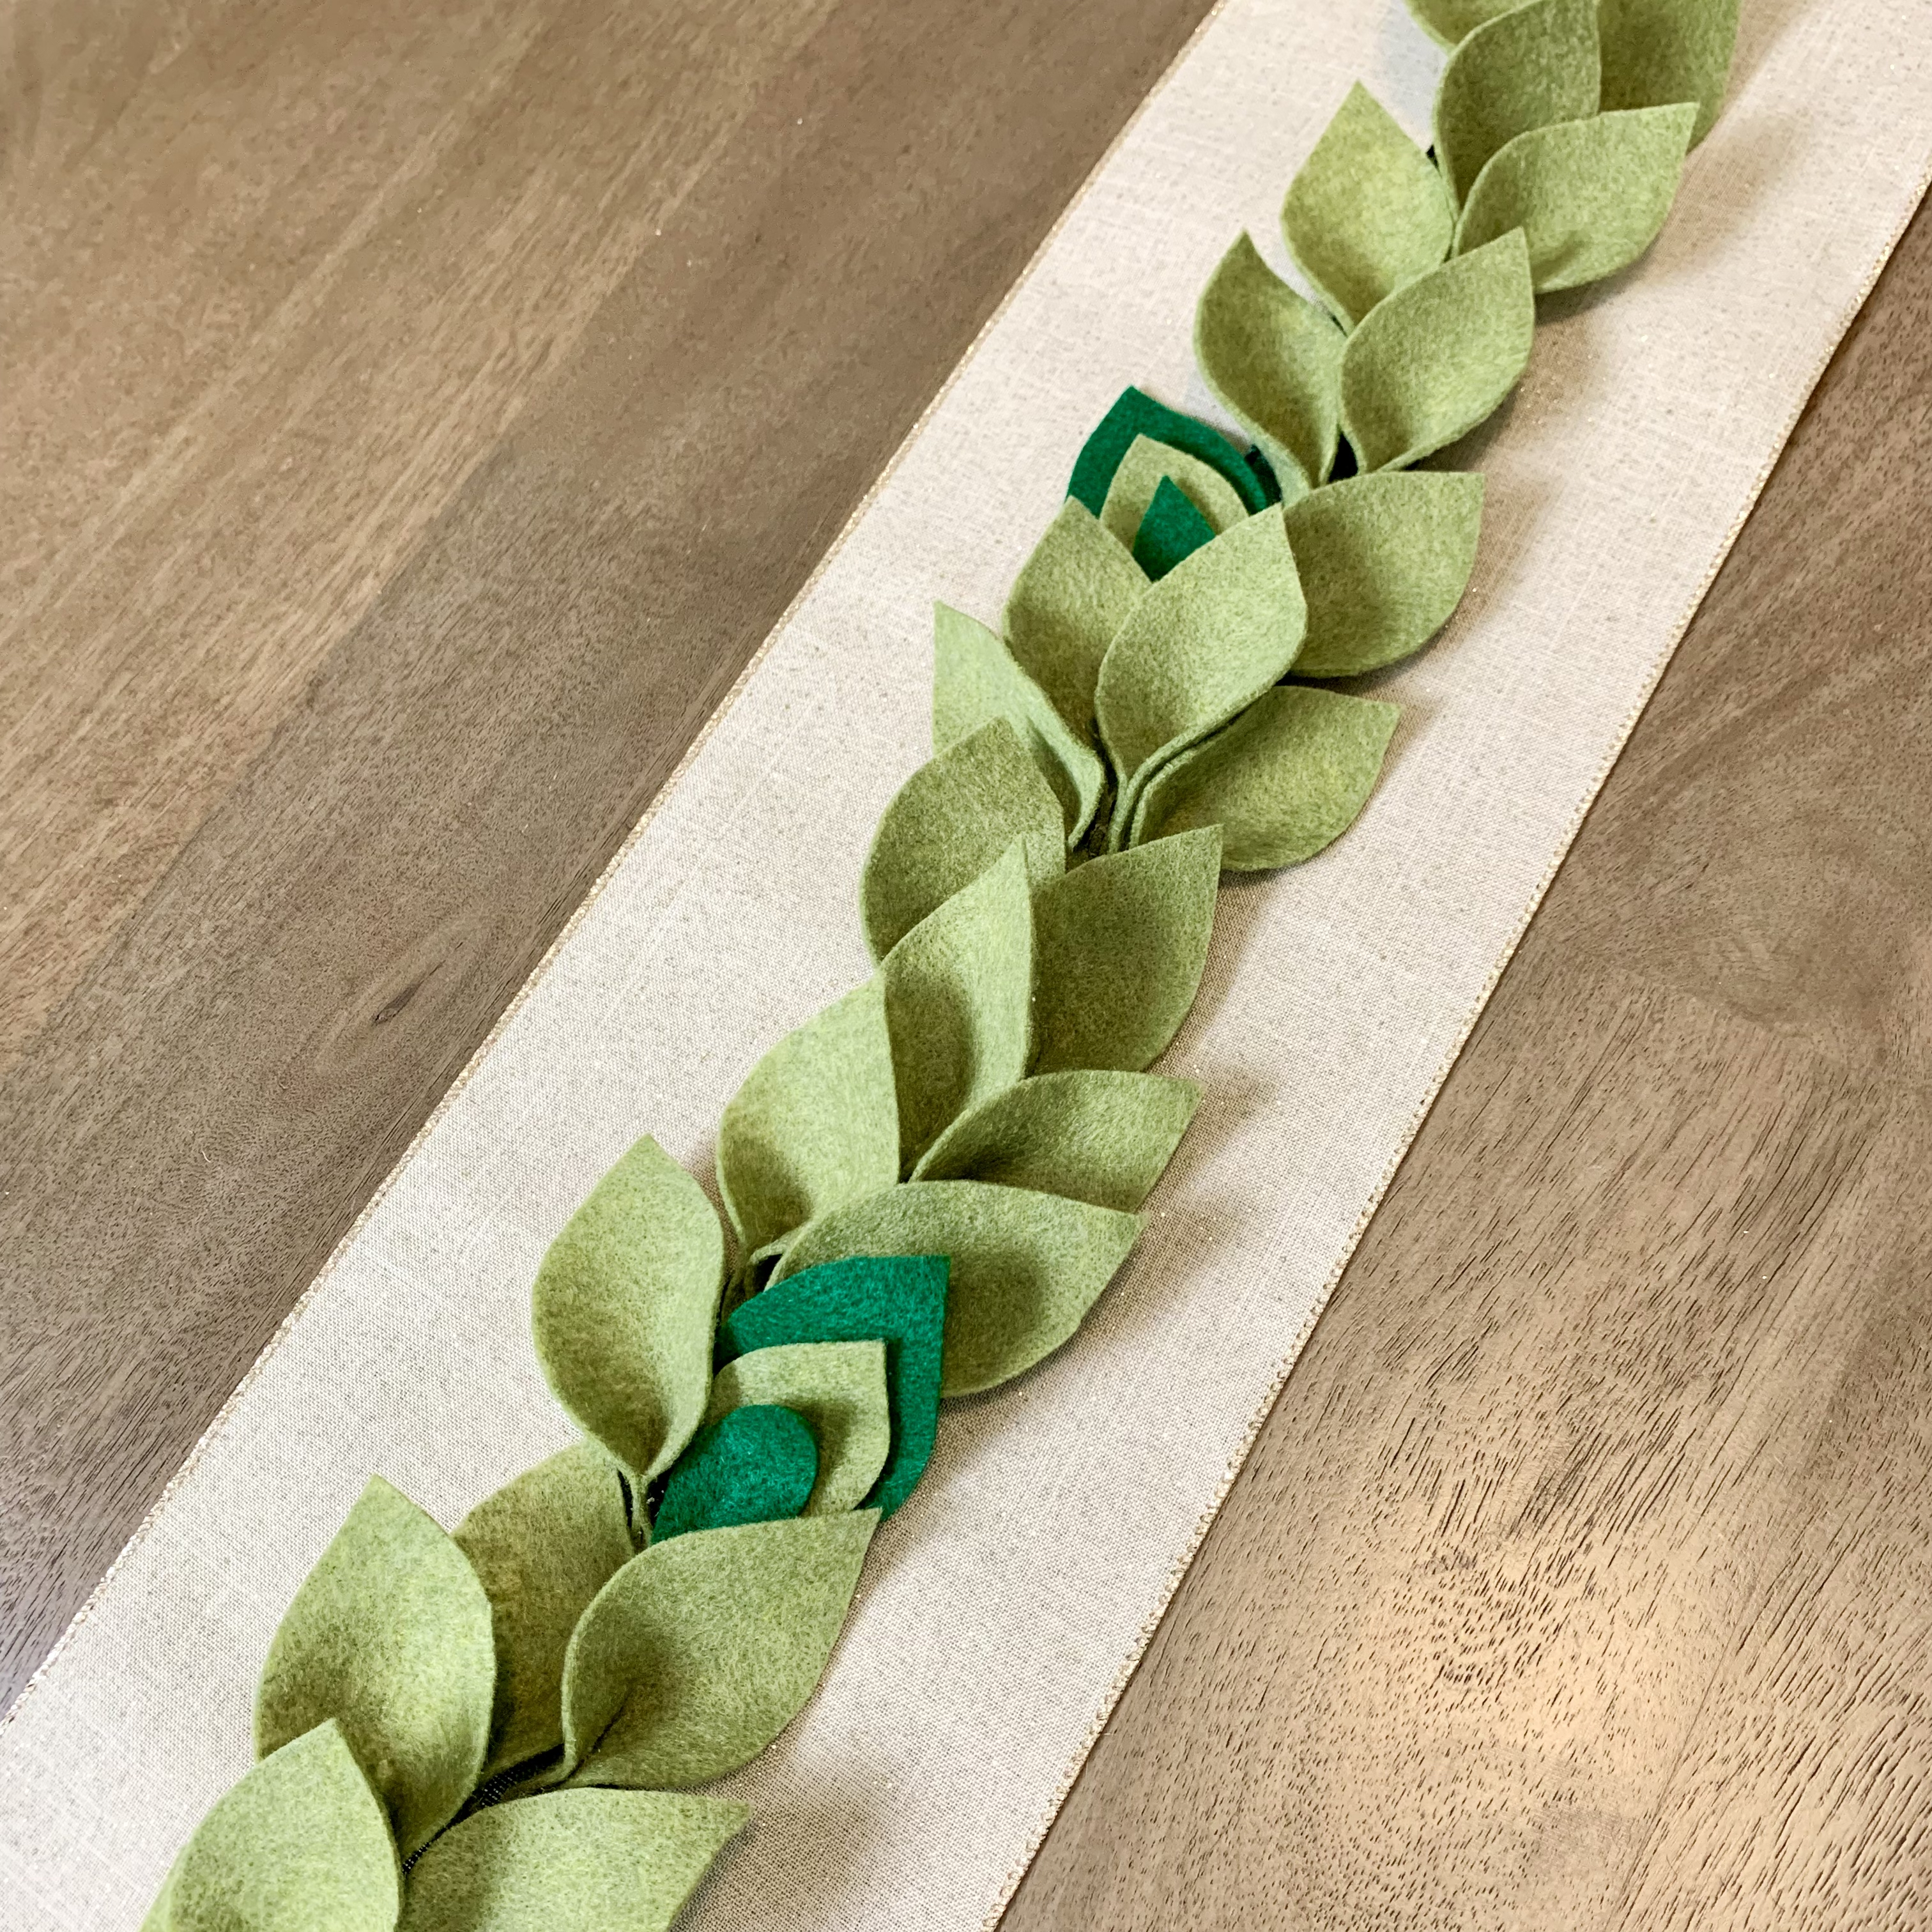
Ok, I know this isn’t a felt ball garland, but it is felt ok?! I got this idea from Alice and Lois, and their holiday felt garland. I put my own spin on this DIY Felt Leaf Garland by adding some darker green shadow leaves and hot glueing all of the felt leaves to a green ribbon I got from Michaels instead of to each other. I think it turned out to be a great accent to my table runner for my Thanksgiving table scape, and I got lots of compliments.  To learn how to make this DIY felt leaf garland, definitely check out Alice and Lois’s tutorial in the link above. And if you want me to show you how I did mine, leave me a message in the comments!
Idea #7 – Felt Pom Pom Garland Around Cake Stand
